Tuesday, July 31, 2012

Banana Tarte Tatin (Jamie Oliver)

This is a video from Jamie my kids love to watch, especially Ian
He's fascinated by the name of this dish, he always said, banana tataten LOL
So when I made this, he was so excited
He said, mummy! U made banana tataten from Jamie!
But then, he also said, I don't like... wew...
True enough, he didn't even want to try
He doesn't like banana, that's the thing
He doesn't like fruits in fact, what he wants to eat occasionally only papaya, apple and pear - that's all. Many think banana is kids' fave - nope, not for Ian's case
Total opposite from Abby, she loves fruits - most of them
Any parent with solution to make the kids like fruits more? :)

Anyway, we love this, Abby too, especially cos banana is one of her favorite fruit :)
When it's in the oven, the whole house was filled with lovely banana smell :)
One thing is, it's a tad sweet to us. I should have reduced the sugar in this sweet treat, since the bananas I used were so sweet


Recipe can be found in this video

What you need:
(below recipe has been adjusted for future use)

6 bananas (I used ripe pisang raja)
40g unsalted butter
100g caster sugar
1/2 tsp ground cinnamon
1 orange - take the zest
plain flour for dusting
1 pack of ready to use puff pastry (mine is 375g)
  1. Preheat oven to 190degC
  2. Place wide rectangle baking tray on medium heat, pour sugar, butter, cinnamon and orange zest -> in this order
  3. Stir constantly til completely combined and turn fire to low
  4. Cook for approx 5 minutes while stirring til sugar has all dissolved and the mixture is golden and caramelized. Turn fire off
  5. Peel bananas, halved, lay carefully on top of the golden caramel
  6. Remove from heat
  7. Roll puff pastry til slightly bigger than the tray, lay on the caramel banana, tuck in the edges and bake for 30 minutes
  8. Once out from oven, immediately overturn the pastry
  9. Serve warm

Many love to eat it with vanilla ice cream or creme fraiche, but we love to eat it on its own, it's already just too good! :)

This is my last submission for Cook Like A Star hosted by Zoe


Even Abby's favorite dog - Bobo, also curious about the taste of this snack :)


Please view below - our friends yummy cookings using Jamie's recipes too :)


Monday, July 30, 2012

Gluten Free Pancakes

Been eyeing on some recipes for gluten free (GF) pancakes and decided on this recipe for the first try, simply because I had all the ingredients in my kitchen cabinet :)

This pancake has nice taste, and soft too, but not as fluffy
Honestly, I still prefer the normal buttermilk pancakes using normal plain flour, but this is definitely a healthier alternative worth trying, especially if you really have to avoid gluten :)


Recipe is from AllRecipes

What you need:

1 cup rice flour
3 tbsp tapioca flour
1/3 cup potato starch
2 cups buttermilk
1 tbsp sugar
1 1/2 tsp baking powder
1/2 tsp baking soda
1/2 tsp salt
2 eggs
3 tbsp canola oil

Sift together rice flour, tapioca flour, potato starch, sugar, baking powder, baking soda, salt
Stir in eggs, buttermilk and oil til well blended and few lumps remains
Heat a pan, put a little bit butter and spread all around
Spoon some batter and let it cooked til bubbles appear and you can lift up the edges
Flip pancake and cook the other side til browned

Serve immediately with maple syrup and fresh fruits of your choice
What a great breakfast!


Note:
You may replace rice flour, tapioca flour and potato starch to plain flour (1 1/3 cup + 3 tbsp)

I'm submitting this post to Aspiring Bakers #21 Gluten Free Bakes hosted by Hankerie

Sunday, July 29, 2012

A Killer Mac 'n' Cheese (Jamie Oliver)

Looks like Jamie has many great pasta recipes
My kids love pasta so no harm trying, especially when the name is so convincing - 'killer' LOL
And yes, it is indeed a killer mac 'n'cheese!
Yummy creamy with juicy tomatoes bursting in every bite.. yum!
I added some chicken breast pieces for added protein :)


Recipe is from HERE

What you need:

25g butter
1 1/2 heaped tbsp plain flour
5 cloves of garlic, peeled and crushed
3 fresh bay leaves (I used dried)
600ml fresh milk
300g dried macaroni
4 tomatoes
75g grated cheddar cheese
50g grated parmesan cheese
1 tsp dried thyme
a couple of splashes worcestershire sauce
1/4 tsp nutmeg
3 big handfuls of fresh breadcrumbs
oilve oil
salt, pepper
a pot of salted water
  1. Bring a pot of salted water to boil
  2. Melt butter in a wok over low heat, add flour and turn up heat to medium, stir all the time til getting a paste
  3. Add in garlic, keep cooking and stirring til golden and fragrant
  4. Add in bay leaves and slowly whisk in the milk a little at a time to get a smooth sauce
  5. Bring mixture to the boil, then leave it on low heat to simmer, stir occasionally
  6. Preheat oven to 220degC
  7. Add macaroni to the pot of boiling salted water and cook according to the instructions
  8. Meanwhile, chop tomatoes on a board and season them well with salt and pepper
  9. Drain macaroni and add immediately to the sauce. Give it a good stir and take the pan off the heat
  10. Stir ingrated cheeses, tomatoes and thyme, also worcestershire sauce and nutmeg
  11. Adjust the taste and texture, it should be slightly too wet because it'll thicken up again in the oven, so if needed, add a little more milk
  12. Transfer to baking dish and bake for 30 minutes til golden, bubbling and crispy
  13. Serve with parmesan cheese powder


Great Jamie's recipe for Cook Like A Star hosted by Zoe


Please check out below - our friends cooked Jamie Oliver's recipes, too :)

Saturday, July 28, 2012

Gluten Free Cheese Oatmeal Cookies

Nobody will know these crunchy cheesy cookies are gluten free!
Delicious and easy to make, too
I made some with chocolate chips instead for the kids
I personally like the cheese better


Recipe is from one of LBT friend, Husfani Agri

What you need:

150g unsalted butter, room temperature
1/4 tsp salt
80g icing sugar, sifted
75g oatmeal, process til fine
75g grated cheddar cheese
150g gluten free flour (GFF), sifted

How to make GFF:


1 cup rice flour
2/3 cup potato starch
1/3 cup tapioca flour
===> Mix well all three flours together in airtight container and store in it
          Makes 2 cups
  1. Put butter in mixing bowl, add in icing sugar, mix with wooden spoon til smooth
  2. Add in oatmeal, mix well
  3. Followed by  cheese, mix well
  4. Lastly, add in GFF gradually
  5. Shape dough into a ball, flatten with rolling pin and shape with cookie cutter as desired
  6. Bake in preheated oven of 160degC for approximately 20 minutes
Note:
* For chocolate chips cookies, replace cheese with the same amount of chocolate chips
* For chocolate cookies, replace 30g of the flour with cocoa powder
* GFF can be replaced with normal plain flour

Friday, July 27, 2012

Bake Along #29 - Chicken Pie

I baked these pies this morning
I always love chicken pie but this is my first time baking one :)
The recipe has been in my to do list for ages, finally I made it


I love these pies, really!
The top crust has a lovely texture and taste oh so buttery, I wish it's like that all over the pies. Because I used alumunium foil cups, the sides and bottom parts were soft yet firm, not crusty
Perhaps the next time I bake, I will not use cups but just shape by hand and put on lined baking tray, that should give crusty skin all over :)
The filling were so tasty, too!
Such a perfect combination :)

I used recipe from Baking Mum for the pastry and for the filling, I combined her recipe and Cooking Crave plus a little modification by me

Another keeper recipe, pretty simple to make, only involved quite a lot of chopping :)

What you need:

For the pastry:

200g butter
250g plain flour
110g plain yoghurt
1 tsp sugar
1 egg yolk
a pinch of salt
  1. Put all ingredients into the mixing bowl except yoghurt and mix to crumble
  2. Add in yoghurt and mix to a dough
  3. Dough will be very soft so need to keep in the freezer for 30 minutes and another 30 minutes in the chiller
For the filling:

3 potatoes, diced
1 onion, diced
1 carrot, chopped
12 strings of french beans, chopped
around 20pcs of white button mushrooms, sliced
2 small chicken breasts, diced (mine is big so I used 1 1/2)
1 heaped tbsp of corn starch, mixed with 2 tbsp water
salt, sugar, pepper
2 + 2 tbsp canola oil

To marinade the chicken:
* 1 tbsp oyster sauce
* 1/2 tsp chicken stock powder
* few shakes garlic salt
* few shakes parsley flakes
* 1 tsp sesame oil
* some pepper

1 egg, beaten - for glazing
  1. Heat 2 tbsp canola oil on a wok, add in potatoes and cook with around 150ml water and salt til soft, set aside
  2. In a clean wok, heat 2 tbsp canola oil and fry onion til fragrant and transparent. Add carrots, french beans, chicken. Fry for a while to break up chicken.
  3. Add in mushroom, stir well til soft
  4. Add in potatoes with the salt water, let cook for 2-3 minutes
  5. Add in salt, pepper and sugar and adjust the taste
  6. When boiling, add in corn starch mixture to thicken the mixture, stir well
  7. Set aside
For the filling, you may add sliced hardboiled eggs
(I wanted to but totally forgotten!)

How to make the pie...
  1. Prepare alumunium foils cup ( I used 7 cups)
  2. Take out the dough from the fridge, and roll on lightly floured surface
  3. Cut the size as required (for the pie base and sides) and arrange on the cups to fit nicely
  4. Poke holes on the base using fork and place filling on top
  5. Cut another piece of dough to cover the top
  6. Poke a few more times using fork on the cover of the pie, and seal the edges by pressing the back of the fork all around, brush with beaten egg
  7. bake in preheated oven of 180degC for 30 minutes approximately or til the top browned
This post is for Bake Along event, hosted by Joyce, Lena and Zoe


Below are the wonderful chicken pies from fabulous bakers joining the event :)

Thursday, July 26, 2012

Banana Honey Buns (Jamie Oliver)

I immediately wanted to try the buns so much only by reading the name - banana and honey - I could taste how yummy it was only by the name :)

When I read Jamie's basic bread recipe, I was quite hesitant to follow to the dot
No butter, no egg, and only water used
Hhmm.. Not too convincing, hence some modification I made
And so glad to know that it turned out lovely
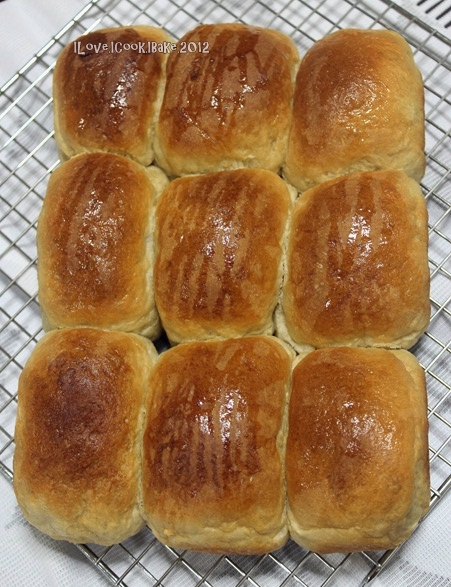
Soft fluffy buns til the next day with banana taste and aroma, added with caramelized honey on the crust
And I added chocolate filling in the buns, which was no regret at all :)


The pictures below were taken in the evening when the buns were just out from the oven


And the two pictures below were taken the next morning, still as soft :)


You may view the recipe HERE
What you need:
(1/4 from the original recipe and adding butter + egg)

1 egg
23g unsalted butter
250g bread flour
1 1/2 very ripe banana - peeled and pureed in food processor
Fresh lukewarm milk - to mix with pureed banana to reach 160ml
8g dried yeast
1/2 heaped tbsp sugar
1/4 tbsp salt
2 tbsp honey (runny) - divided
some chocolate chips fo filling
  1. I used breadmaker to do the kneading and first proofing, around 1 hour 30 minutes
  2. Put the wet ingredients first to the breadmaker pan - egg, the banana and milk mixture, and 1 tbsp of honey
  3. Followed by flour, sugar, salt and yeast
  4. Once the process done, take the dough out and knead for around 1 minute to let the air bubble out
  5. Shape into 50g ball each, flatten the ball, put some chocolate chips at the centre and shape like a ball
  6. Place on baking tray lined with non stick baking paper, sealed part at the bottom
  7. Let proof for another 1 hour til doubled in size
  8. Before baking, drizzle the remaining honey on the buns
  9. Bake in preheated oven of 190degC for 20 minutes or til the top browned and the hollow sound when tapping its bottom
  10. Take out from the oven and let cool on cooling rack

Another Jamie's recipe for Cook Like A Star hosted by Zoe


Below are the cooking by our friends using Jamie's recipes too :)


Tuesday, July 24, 2012

Chicken Chow Mien (Jamie Oliver)

I cooked this noodles for Ian's birthday. It's a routine in the family - besides cake, to have noodles on one's birthday
Very simple, fast to prepare and surprisingly yummy recipe Jamie has, knowing the minimum seasonings used


The recipe can be found in Jamie's YouTube video

What you need:
(with slight modification)

a pack of egg noodles
4 cloves of garlic, crushed
a thumb size of old ginger, sliced
1 large red chilli, sliced
1 boneless chicken breast, diced
a few shitake mushrooms, sliced
1 pack of bokchoy, sliced
a bunch of coriander leaves, use the stalks, cut
1 big stalks of spring onion, chopped
a pot of water
a few pinches of chicken stock powder
cooking oil, salt, light soya sauce, sesame oil, corn flour, a little water
large lime
  1. Bring a pot of water to boil, cook the noodle
  2. Halfway cooking, add in bokchoy, drain and set aside
  3. When cooled, mix in sesame oil to the noodles
  4. In a hot wok, heat cooking oil, add in chicken and cook til color changed
  5. Add in garlic, ginger, chilli, coriander stalks, spring onion, mix well and cook til fragrant
  6. Add in noodles and bokchoy
  7. Add in mushroom, some water, chicken stock powder, light soya sauce, mix well and cook til water bubbles
  8. Add in cornflour and immediately stir well
  9. Adjust taste and off heat
  10. Serve hot with a squeeze of juice of a large lime
I'm submitting this post for Cook Like A Star hosted by Zoe
The chef of the month is Jamie Oliver, one of my favorite chef :)


Below are the cooking from friends joining this event


    Monday, July 23, 2012

    THB #6 Mocha-Cappuccino Marbled Coffee Cake - Another Birthday Cake For Ian

    I baked this sixth cake for THB for Ian's birthday cake to be brought to his school to celebrate with his classmates

    Among many car toys he loves, he adores Tomica the most
    And the edible image on the cake below is his request :)


    I was so tempted to add a little kahlua in the cake, but many kids would eat this cake, so no, not this time, but I am sure it would taste nice!
    I baked some in cupcakes for our own consumption


    From the book Coffee Cakes by Lou Seibert Pappas
    Very straight forward cake to make, I love the coffee taste and aroma
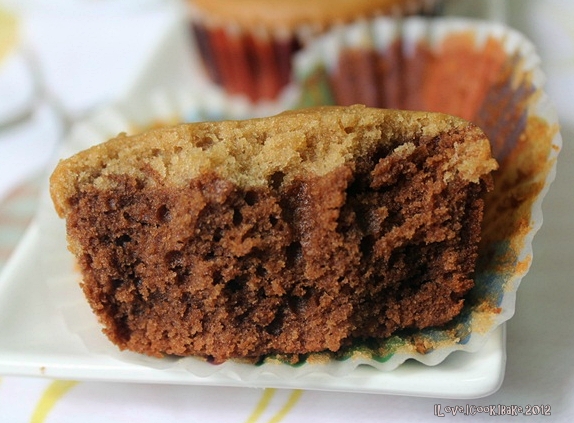
    Soft texture, light, not dry and yummy taste everybody in the house loves :)
    I almost forgot that chocolate and coffee work well together, too - the color and the taste, too
    I wasn't sure why I didn't get the marble effect, I did swirl the batter with skewer, perhaps I didn't do it correctly :)

    I followed the recipe to the dot except that I reduced the sugar to 190g and I divided equally half each for chocolate and coffee batter
    Used melted dark chocolate (50%) and added the coffee mixture to 2 1/2 tbsp for both the powder and water

    For full recipe, please visit Lena's site, she chose this delicious tea time perfect companion :)
    Please view HERE to check out other members' creations of this cake

    Friday, July 20, 2012

    Fire Truck Birthday Cake For Ian - He's 5 Today! - Gluten Free Steamed Brownies

    See what I have made today, it's a birthday cake for Ian
    He requested for a fire truck cake
    He's not only a car lover, but also all kinds of trucks, buses and all heavy weight machines
    Last year I did a car cake for him at his request too, so this year he switched to something else :)
    Luckily I could find a tutorial for the cake from Betty Crocker, you may watch the video HERE
    My first barbie cake last year also followed tutorial from Betty Crocker

    It's a simple cake - well, looked simple enough to me but still I couldn't make as neat as the one in the video, as you know, I'm a big zero in cake decorating LOL

    Anyway, Ian loved it so much!
    He did watch the video too a couple of times, so when I did the carving and the frosting also the decorating, he was all the time beside me, watching me doing everything, and commenting what to do next :)


    It's 100% buttercream frosting, the wheels are oreo biscuits, the lights are all gummies, and the hose is fondant, since I couldn't find black licorice

    Hhhhmmm I wonder how to make my hands not trembling and moved steadily while doing the frosting, as you can see, those meant to be straight lines weren't straight, eg: the windows, and the rest... wew...
    Well, what matters most is, the birthday boy was happy :)

    I used Indonesian style Mrs Liem steamed brownies recipe, very well known among Indonesian foodies
    Very fine texture, soft but sturdy enough to be used for 3D carved cake
    Very yummy, moist and chocolatey

    Here's the recipe, I made this cake gluten free by replacing the plain flour with gluten free flour mixture (GFF)

    For the GFF:

    1 cup rice flour
    2/3 cup potato starch
    1/3 cup tapioca flour

    Mix well all three flours together in airtight container and store in it
    Makes 2 cups

    This GFF gives very satisfying result that mocaf flour can't compare
    I definitely prefer this mixture

    For the cake:

    6 eggs
    225g caster sugar
    1 tsp vanilla extract
    a pinch of salt
    1/2 tsp sponge gel (optional)
    125g GFF
    50g cocoa powder (I used valrhona)
    175ml canola oil
    100g dark chocolate, melted
    75ml sweet condensed milk
    1. Grease pans (I used 2 loaf pans)
    2. Beat eggs, sugar and sponge gel til ribbon stage (high speed)
    3. On low speed, add in sifted GFF flour, cocoa powder and mix well
    4. Add in melted chocolate and oil, mix well
    5. Divide the batter into three parts, one parts to mix with sweet condensed milk
    6. Preheat steamer til very hot
    7. Pour one part of the batter in the pans, and put them in steamer, steam for 10 minutes over medium fire
    8. Pour the batter with sweet condensed milk on top and steam for another 10 minutes
    9. Pour the last part of the batter and steam for another 20-25 minutes

    For the buttercream, I used Aunty Yochana's recipe:

    What you need:

    200g sugar
    60g water
    140g egg white
    300g butter
    300g shortening
    1.  Boil sugar and water till thick but flowy
    2.  Beat egg white  (high speed) till fluffy (medium peak), then pour in the hot syrup
    3.  Continue beating the egg white till cool (low speed)
    4.  Slowly add in the chilled butter and shortening and let it beat till thick and fluffy
     
    Here's a snap of the cake texture, so fine, chocolatey, soft and moist!


    I'm submitting this post to Aspiring Bakers #21 Gluten Free Bakes hosted by Hankerie

    Now, I have another cake to bake to bring to his school on Monday to celebrate with his friends
    Wanted to do this morning but since today was Racial Harmony Day and they had programs at the school, so we're advised to do the celebration on Monday instead
     
     
    To Ian, happy birthday to you
    Mummy, daddy and Abby love you, as always!
    God bless you always
    Hugs and kisses XOXO

    Wednesday, July 18, 2012

    Fried Spaghetti

    Simple dish when I am so bored of the classic pasta dishes I always cook for my family
    A nice twist which loved by my kids, too :)


    Recipe is from Melly's site

    What you need:

    100g spaghetti
    5 prawns - deshelled and washed
    1/2 capsicum, cut small (I use yellow, you might use red, too)
    4 button mushrooms, sliced
    1 large chilli, thinly sliced (I skipped this, my kids don't eat spicy food - yet :P)
    1/4 onion, chopped
    2 cloves of garlic, crushed
    1 tbsp oyster sauce
    1 tbsp chilli sauce (I skipped this too, if not cos of my kids I would have added this! :P)
    2 tbsp spaghetti sauce (I used Prego roasted garlic and parmesan)
    salt and pepper to taste
    chopped spring onion to garnish
    cooking oil
    a pot of water with a big pinch of salt
    1. Heat salt water in a pot til boiling, add in spaghetti and cook til al dente, drain and splash with cold water, set aside
    2. Heat oil on a pan, stir fry garlic and onion til fragrant and soft
    3. Add in prawns, capsicum, mushrooms, chilli and mix well
    4. Add in spaghetti, oyster sauce, spaghetti sauce, chilli sauce and mix well
    5. Add in salt and pepper to taste
    6. Arrange on a serving plate, garnish with spring onion
    Yummy yummy lunch to munch :)

    Monday, July 16, 2012

    Bake Along #28 - Gluten Free Coconut Checkerboard Brownies

    I was curious to find how this two combination taste like
    Brownies and coconut, one thing I never think of putting together
    To my surprise, it's not bad at all - an occasional nice twist which every brownie lover can't say no to
    East and West brownies, very nice indeed :)

    Knowing that my kids will not fancy brownies with coconut, I made using 20cm square pan, half just plain brownies :)
    They enjoyed the brownies, a little too sweet - even though I have reduced the amount of sugar used, but nice

    One problem was, I couldn't make a nice checkerboard design, I wasn't sure what I made actually... Checkerboard? No... Polkadot? No...
    Anyway, it looked better after I cut into small squares hehehe....


    Fudgy brownies - my kind of brownies :)


    Recipe is from the book Bon Appetit Desserts by Barbara Fairchild

    What you need:
    (modified to suit my family liking)

    Coconut batter:
    (I made half of the recipe below)

    200g fresh grated coconut
    20g icing sugar
    60ml cream of coconut
    60g Philadelphia cream cheese, cut into 1 inch cube, room temperature
    1 large egg
    a big squeeze of lemon juice
    pinch of salt

    Brownies batter:

    90g unsalted butter, cut into 6 pieces
    100g dark chocolate, chopped
    2 large eggs
    1/4 tsp vanilla extract
    200g golden brown sugar (will reduce to 150g the next time I bake this again)
    85g mocaf flour, sifted then measured
    1/4 tsp baking powder
    1/8 tsp salt

    To make the coconut batter:
    Measure 1/3 cup flaked coconut, cover and set aside. Place the remaining coconut and sugar in processor, finely chop. Add cream of coconut, cream cheese and blend well. Add egg, lemon juice and salt, blend well, stop ocassionally to scrape down the sides of the bowl. Transfer to bowl. Cover and refrigerate til very firm, about 3 hours (I did overnight)

    To make the brownies batter:
    Butter pan (I used 20 x 20 x 4cm square pan). Melt butter and chocolate in heave small saucepan over low heat, stir til smooth. Pour into medium bowl. Cool to lukewarm. Whisk in eggs and vanilla. Whisk sugar, flour, baking powder, salt in small bowl
    Sift over chocolate mixture. Mix til blended and smooth. Spread 1 1/4 cups of the batter in the pan and cover pan tightly with aluminium foil. Refrigerate til very firm about 3 hours. Also refrigerate the remaining batter in the container (I did overnight)
    1. Position rack in the centre of the oven and preheat to 165degC
    2. Alternate 1 tbsp of the remaining brownies batter and 1 tbsp of coconut batter over chocolate layer, filling pan completely. Sprinkle reserved 1/3 cup of the coconut over coconut mounds, press gently to adhere. bake for approximately 45 minutes til skewer comes out clean
    3. Cool completely and cut

    This time, I used gluten free mocaf flour for this brownies, this is my second brownies using this flour (the first one I used different recipe) and both gave nice results
    A little details about mocaf flour can be read HERE

    Initially I wanted to use gluten free flour mixture from this site which many gave good reviews
    But then I realized what I had was tapioca starch, while the recipe said tapioca flour
    I wasn't sure whether these two are the same or different
    I googled for information, many said they're the same, but some said different
    So, I decided to use mocaf flour for now, while searching for the real truth :)
    Anybody know the answer? :)


    This post is for Bake Along event, hosted by Joyce, Lena and Zoe
    Please view other wonderful bakers in the link tool below to see their lovely brownies too :)


    I'm also submitting this post to Aspiring Bakers #21 Gluten Free Bakes hosted by Hankerie

    Wednesday, July 11, 2012

    Banana Chocolate Sprinkles Cake Pops

    I was trying one of the recipe have been in my to do list for quite sometime, moist banana cake from Edith's site, when I realized there's something wrong with my oven, I guess the temperature dropped, the cake was only fully baked after an hour while Edith wrote it only took 20 minutes to bake!
    As a result, the cake didn't turn out nice, it sunk, and the texture was dense and the cake was heavy. Eating the cake was no fun at all :(

    So, since LBT challenge this month is cake pops, I decided to trasnform the disappointment into something for others to enjoy, in this case - the kids :)

    I crushed most of the cake with my own hand to relieve my sorrow LOL
    Mixed it with Martha Stewart cream cheese frosting til it's sticky enough to shape, shaped into balls
    Dipped lollipop sticks in melted dark chocolate and white chocolate and poked the balls with them, immediately kept them in the fridge for an hour


    The white and dark chocolate dips, pearls, stars and hearts sprinkles, gummies, and the styrofoam board


    After an hour in the fridge, dip the pops into the chocolates and sprinkles as desired and put it standing upright by poking the sticks into the styrofoam board, and chilled overnight

    And here is mine...


    This one was just dipped plain without any sprinkles, I prefer to bite without sprinkles :P


    Ok, I was feeling a little better after seeing the little pops and watching my kids happily munching on them. Sorrow turned to joy LOL

    Now, gotta call the oven service centre to ask them to give it a check *sigh*

    Tuesday, July 10, 2012

    Tofu Puff in Hot Sour Sauce (Tahu Gejrot)

    This snack is easy to find anywhere in Indonesia, from roadside stalls to foodcourts
    But in Singapore, I gotta make it myself to be able to enjoy this traditional snack I haven't had in ages :)

    I was delighted to see the recipe in Dessy's site and immediately gave it a go
    Hhhmmm so refreshing, especially when the sauce is kept chilled in the fridge, poured on the still hot tofu :)


    What you need:

    10pcs of tofu puff, fried til crisp and cut

    For the sauce:
    half block of palm sugar
    2 tbsp
    2 tbsp dark sweet soya sauce (kecap manis)
    1 tsp salt
    350ml water

    For the chilli topping: (mix together)
    4 shallots, chopped
    2 cloves of garlic, crushed
    2 bird's eye chillis, chopped
    1. Bring to boil all ingredients for the sauce, strain
    2. Pour over the hot tofu and eat with the chilli topping

    Simple and satisfying, I love! :)

    Sunday, July 8, 2012

    Meatballs Pizza (Jamie Oliver)

    I did make meatball pizza, after I mentioned it in my last posting :)
    This pizza used Jamie's pizza dough recipe, which I ever made before, and we loved it :)


    Here's the recipe:

    What you need:
    (below is double recipe)

    260ml lukewarm water
    1 tsp sugar
    2 tsp instant yeast
    2tbs extra virgin olive oil
    400g bread flour
    1 tsp sea salt

    Topping:
    Jamie's meatballs (recipe HERE) - halved
    tomato based pasta sauce (I used Prego traditional)
    button mushrooms, cut
    grated cheddar cheese
    grated mozzarella cheese

    1. Sprinkle sugar and yeast over water. Set aside for about 10 min till frothy
    2. Pour yeast mixture and oil into flour and salt
    3. Knead dough till smooth and springy
    4. Place the ball of dough in a large flour-dusted bowl. Proof for about 30 min till double in size
    5. Knock back dough and roll out to a 12" circle
    6. Place on a greased and floured baking pan
    7. Spread tomato based pasta sauce of your choice, place halved meatballs, cut button mushrooms, and then sprinkle grated cheddar cheese and mozzarella cheese
    8. Bake in preheated oven of 220degC for 15-20 min till the crust is brown and the cheese is bubbly
    The pizza dough is another keeper recipe, a must try!