Showing posts with label brownies. Show all posts

Friday, July 20, 2012

Fire Truck Birthday Cake For Ian - He's 5 Today! - Gluten Free Steamed Brownies

See what I have made today, it's a birthday cake for Ian
He requested for a fire truck cake
He's not only a car lover, but also all kinds of trucks, buses and all heavy weight machines
Last year I did a car cake for him at his request too, so this year he switched to something else :)
Luckily I could find a tutorial for the cake from Betty Crocker, you may watch the video HERE
My first barbie cake last year also followed tutorial from Betty Crocker

It's a simple cake - well, looked simple enough to me but still I couldn't make as neat as the one in the video, as you know, I'm a big zero in cake decorating LOL

Anyway, Ian loved it so much!
He did watch the video too a couple of times, so when I did the carving and the frosting also the decorating, he was all the time beside me, watching me doing everything, and commenting what to do next :)


It's 100% buttercream frosting, the wheels are oreo biscuits, the lights are all gummies, and the hose is fondant, since I couldn't find black licorice

Hhhhmmm I wonder how to make my hands not trembling and moved steadily while doing the frosting, as you can see, those meant to be straight lines weren't straight, eg: the windows, and the rest... wew...
Well, what matters most is, the birthday boy was happy :)

I used Indonesian style Mrs Liem steamed brownies recipe, very well known among Indonesian foodies
Very fine texture, soft but sturdy enough to be used for 3D carved cake
Very yummy, moist and chocolatey

Here's the recipe, I made this cake gluten free by replacing the plain flour with gluten free flour mixture (GFF)

For the GFF:

1 cup rice flour
2/3 cup potato starch
1/3 cup tapioca flour

Mix well all three flours together in airtight container and store in it
Makes 2 cups

This GFF gives very satisfying result that mocaf flour can't compare
I definitely prefer this mixture

For the cake:

6 eggs
225g caster sugar
1 tsp vanilla extract
a pinch of salt
1/2 tsp sponge gel (optional)
125g GFF
50g cocoa powder (I used valrhona)
175ml canola oil
100g dark chocolate, melted
75ml sweet condensed milk
  1. Grease pans (I used 2 loaf pans)
  2. Beat eggs, sugar and sponge gel til ribbon stage (high speed)
  3. On low speed, add in sifted GFF flour, cocoa powder and mix well
  4. Add in melted chocolate and oil, mix well
  5. Divide the batter into three parts, one parts to mix with sweet condensed milk
  6. Preheat steamer til very hot
  7. Pour one part of the batter in the pans, and put them in steamer, steam for 10 minutes over medium fire
  8. Pour the batter with sweet condensed milk on top and steam for another 10 minutes
  9. Pour the last part of the batter and steam for another 20-25 minutes

For the buttercream, I used Aunty Yochana's recipe:

What you need:

200g sugar
60g water
140g egg white
300g butter
300g shortening
  1.  Boil sugar and water till thick but flowy
  2.  Beat egg white  (high speed) till fluffy (medium peak), then pour in the hot syrup
  3.  Continue beating the egg white till cool (low speed)
  4.  Slowly add in the chilled butter and shortening and let it beat till thick and fluffy
 
Here's a snap of the cake texture, so fine, chocolatey, soft and moist!


I'm submitting this post to Aspiring Bakers #21 Gluten Free Bakes hosted by Hankerie

Now, I have another cake to bake to bring to his school on Monday to celebrate with his friends
Wanted to do this morning but since today was Racial Harmony Day and they had programs at the school, so we're advised to do the celebration on Monday instead
 
 
To Ian, happy birthday to you
Mummy, daddy and Abby love you, as always!
God bless you always
Hugs and kisses XOXO

Monday, July 16, 2012

Bake Along #28 - Gluten Free Coconut Checkerboard Brownies

I was curious to find how this two combination taste like
Brownies and coconut, one thing I never think of putting together
To my surprise, it's not bad at all - an occasional nice twist which every brownie lover can't say no to
East and West brownies, very nice indeed :)

Knowing that my kids will not fancy brownies with coconut, I made using 20cm square pan, half just plain brownies :)
They enjoyed the brownies, a little too sweet - even though I have reduced the amount of sugar used, but nice

One problem was, I couldn't make a nice checkerboard design, I wasn't sure what I made actually... Checkerboard? No... Polkadot? No...
Anyway, it looked better after I cut into small squares hehehe....


Fudgy brownies - my kind of brownies :)


Recipe is from the book Bon Appetit Desserts by Barbara Fairchild

What you need:
(modified to suit my family liking)

Coconut batter:
(I made half of the recipe below)

200g fresh grated coconut
20g icing sugar
60ml cream of coconut
60g Philadelphia cream cheese, cut into 1 inch cube, room temperature
1 large egg
a big squeeze of lemon juice
pinch of salt

Brownies batter:

90g unsalted butter, cut into 6 pieces
100g dark chocolate, chopped
2 large eggs
1/4 tsp vanilla extract
200g golden brown sugar (will reduce to 150g the next time I bake this again)
85g mocaf flour, sifted then measured
1/4 tsp baking powder
1/8 tsp salt

To make the coconut batter:
Measure 1/3 cup flaked coconut, cover and set aside. Place the remaining coconut and sugar in processor, finely chop. Add cream of coconut, cream cheese and blend well. Add egg, lemon juice and salt, blend well, stop ocassionally to scrape down the sides of the bowl. Transfer to bowl. Cover and refrigerate til very firm, about 3 hours (I did overnight)

To make the brownies batter:
Butter pan (I used 20 x 20 x 4cm square pan). Melt butter and chocolate in heave small saucepan over low heat, stir til smooth. Pour into medium bowl. Cool to lukewarm. Whisk in eggs and vanilla. Whisk sugar, flour, baking powder, salt in small bowl
Sift over chocolate mixture. Mix til blended and smooth. Spread 1 1/4 cups of the batter in the pan and cover pan tightly with aluminium foil. Refrigerate til very firm about 3 hours. Also refrigerate the remaining batter in the container (I did overnight)
  1. Position rack in the centre of the oven and preheat to 165degC
  2. Alternate 1 tbsp of the remaining brownies batter and 1 tbsp of coconut batter over chocolate layer, filling pan completely. Sprinkle reserved 1/3 cup of the coconut over coconut mounds, press gently to adhere. bake for approximately 45 minutes til skewer comes out clean
  3. Cool completely and cut

This time, I used gluten free mocaf flour for this brownies, this is my second brownies using this flour (the first one I used different recipe) and both gave nice results
A little details about mocaf flour can be read HERE

Initially I wanted to use gluten free flour mixture from this site which many gave good reviews
But then I realized what I had was tapioca starch, while the recipe said tapioca flour
I wasn't sure whether these two are the same or different
I googled for information, many said they're the same, but some said different
So, I decided to use mocaf flour for now, while searching for the real truth :)
Anybody know the answer? :)


This post is for Bake Along event, hosted by Joyce, Lena and Zoe
Please view other wonderful bakers in the link tool below to see their lovely brownies too :)


I'm also submitting this post to Aspiring Bakers #21 Gluten Free Bakes hosted by Hankerie

Friday, May 25, 2012

Gluten Free Cassava Fudgy Brownies

Good knowing for once I can make gluten free bake
I read many times, gluten takes the longest time to digest, it can be as long as 3 days!
This brownies used modified cassava flour I got from Indonesia
It has perfect texture, fudgy, a little gooey, with flaky crust on top... my kind of brownies
Taste wise, nobody will know it's gluten free.
The usage of Valrhona cocoa made this brownies taste even better. Simply delicious!

A little description about the flour adapted from Ricke's site where the recipe comes from...

Modified cassava flour (mocaf) is made from cassava made into powder form, and then processed using enzyme from yeast whom able to break down cassava flour cells resulting in finer texture, brighter white color and trace of cassava odor can be minimized to 70%
Mocaf is different from cassava flour or tapioca starch
The characteristic is very close to plain flour so it can be used for cake making
But it's gluten free, unlike plain flour, resulting in shorter cake
Replacement to mocaf can be done 100% or only partial - combining with plain flour
Only for bread making, certain percentage of high protein flour must be present, since gluten is essential to reach elasticity and to help the bread to rise well, too
What you need:

225g butter
125g dark cooking chocolate
200g mocaf
50g Valrhona cocoa powder
20g full cream milk powder
1/2 tsp baking powder
1 tsp vanilla extract
4 medium eggs
300g caster sugar
For topping: walnuts and chocolate chips
  1. Preheat oven to 180degC
  2. In a pot over low fire, melt butter and chocolate, set aside
  3. Grease 24cm square pan (height 4cm), line with baking paper, grease again, set aside
  4. Sieve mocaf, cocoa powder, milk powder, baking powder, set aside
  5. Whisk eggs and sugar til dissolved (need not to expand)
  6. Add in mixture of butter and chocolate, also vanilla, mix well
  7. Add in sifted flour mixture, stir til just combined
  8. Pour batter into pan, sprinkle with chocolate chips and walnuts, bake for 45 minutes or til skewer comes out clean
I'm linking up this post to :
* Allergy Free Wednesday #18
* Sweet Treats and Swanky Stuff Thursday
* SweetTooth Friday
* Sweets For A Saturday #71

    Thursday, February 16, 2012

    Steamed Chocolate & Pandan Brownies

    Yum yum yum... that's the only description I can think of when I sank my teeth in this moist brownies :)
    And after that, the only think I could think of was to sink my teeth into it again and again LOL
    Recipe is from Ricke's site with slight modification
    What you need:
    A
    6 eggs
    200g sugar
    1 tsp ovalette
    1/2 tsp salt
    B
    150g plain flour
    20g milk powder
    20g corn flour
    1 tsp baking powder
    1 tsp vanilla essence
    C
    100g cooking oil
    100g white chocolate, chopped
    50ml thick coconut milk + 2 tbsp pandan juice + 1 tsp pandan paste
    1. Heat up steamer and wrap the cover with clean cloth
    2. Grease 20cm round pan, lay baking paper on top and grease again on top of the baking paper
    3. Heat up coconut milk til warm only, off heat, add white chocolate, mix well til chocolate melts and well mixed with coconut milk, add in oil, set aside
    4. Sift all ingredients B together
    5. Beat A on high speed til doubled in volume, thick and pale (ribbon stage). addin B mixture in low speed
    6. Scoop 1/3 of the batter, add in C mixture, mix well and put back to the remaining batter and fold in gently
    7. Scoop half of the batter, mix with enough chocolate emulco
    8. Pour pandan batter into the pan, steam 15minutes, pour in chocolate batter, steam 30minutes (all on medium heat) 
    9. After cooked, immediately take out from the pan, let cool
    10. After cooled, spread the top with chocolate ganache (I used nutella) and sprinkle with grated cheese
    Really yummy!!! These are the reasons I can think of why one cannot enjoy this brownies: one doesn't like pandan and/or chocolate, one doesn't like cakes. No other reason - period :)
    
    I'm posting this for Sweets For A Saturday #57

    Tuesday, January 10, 2012

    Bake Along #16 - Black Glutinous Rice Flour Steamed Brownies

    I've eaten this brownies which is very popular in Indonesia, it was quite sometime back and was hooked by the taste and texture
    I managed to find the flour in Indonesia, it's easily found in any baking shops anywhere. It's possible to make the flour but it's too troublesome to me
    Finally I could make this yummy brownies :)


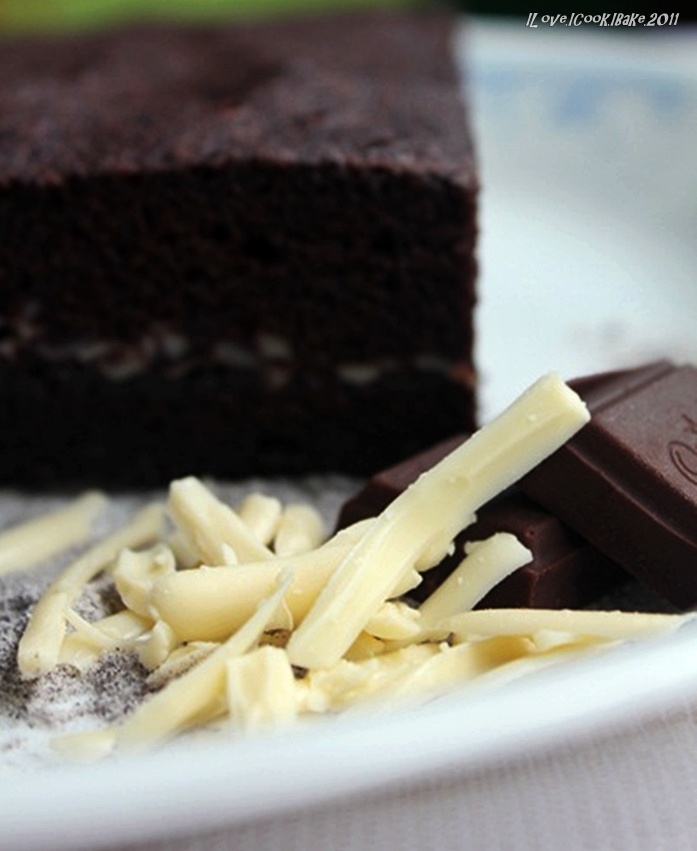
    Original recipe uses chocolate rice as filling, I used shaved dark chocolate and grated cheddar cheese, yum!
    Chocolate and cheese.. perfect combination I can never live without :)


    Recipe is from Ricke's site

    What you need:

    6 eggs
    200g sugar
    1 tsp ovalette (optional)
    1/4 tsp salt
    1 tsp vanilla extract
    2 tbsp sweet condensed milk
    250g black glutinous rice flour
    20g cocoa powder
    100g chopped dark chocolate
    200g canola oil (or melted butter)

    Filling:
    enough shaved dark chocolate (or chocolate rice)
    enough grated cheddar cheese
    1. Heat up steamer, wrap the cover with clean cloth. Sieve black glutinous rice flour and cocoa powder together, set aside. Grease pan, line with baking paper and grease on top. I used 2 pans of rectangle brownies pans sized approximately 20 x 10 x 4cm
    2. Melt chopped chocolate together with oil, mix well and let cool
    3. Beat eggs, sugar, ovalette and salt on high speed til ribbon stage. Lower speed, add in vanilla, mix well, followed by condensed milk, mix well
    4. Add in sifted flour gradually on low speed til well mixed (not so long, around 1 minute)
    5. Add in 1/3 of the batter into the chocolate and oil mixture, fold in til evenly mixed and then pour to the remaining batter, fold in gently
    6. Divide the batter into two, pour one portion to the pan, steam on medium fire for 10 minutes, sprinkle chocolate and cheese on top, followed by pouring the remaining one portion of the batter, let continue steaming for 25 minutes
    7. Remove from steamer and take out from the pan immediately, let cool on the cooling rack
    This brownies is considered fudgy type, even though it's not as rich as those baked fudgy brownies
    Taste chocolaty, and even though the batter feels sandy cos of the type of flour used, but the brownies doesn't have any sandy texture at all
    Soft, and easy to eat, really addictive.. I definitely will make this again :)
    And it's good to know that oil is used instead of butter, and the flour is definitely much healthier than just normal plain flour


    This brownies is dedicated to Bake Along No. 16 : Theme - Brownies
    Please hop on to the hosts wonderful brownies creations: Lena and Zoe
    Joyce is also one of the host for this fun event, but she has some personal matter to attend for this time, hope everything is settled for her and we can see her again the next event :)

    Wednesday, October 19, 2011

    Bake Along #12 - Cherry Brownie Torte

    This is what I baked for Bake Along #12 with chocolate and cherry theme
    Cherry brownie torte - sinfully rich and chocolatey... yum! :)
    Also, it's easy to make - no mixer involved, yes! :)

    You see the pic below, I couldn't wait til it's frosted I cut a slice for me to try when it's still warm :)

    The frosting is a layer of whipped cream (I used whipping cream and beat til stiff) and decorated with maraschino cherries

    Look at the cherry bits as well as the whole cherries on top - such a georgeous color :)

    Recipe is from Easy Baking by Hershey's (original recipe uses berries)

    What you need:

    1/2 cup all purpose flour
    1/4 tsp baking soda
    1/4 tsp salt
    1 cup semi sweet chocolate chips (I found this is too much for me, the next time I make I'll reduce this to 2/3 cup instead)
    1/2 cup butter
    1 cup sugar
    2 eggs
    1 tsp vanilla extract
    1/3 cup cocoa powder (preferably dark cocoa)
    1/2 cup whipping cream
    maraschino cherries - chopped, enough to sprinkle on top of the batter
    maraschino cherries - whole, for decoration

    Heat oven to 175degC
    Line a 8" round baking pan with baking paper and then grease
    Stir together flour, baking soda and salt, stir in chocolate chips - set aside
    Melt butter in medium saucepan over low heat. Remove from heat
    Stir in sugar, eggs and vanilla. Add in cocoa powder, mix well
    Stir in flour mixture and then spread mixture in prepared pan
    Sprinkle cherries bits on top
    Bake for 25minutes or til wooden pick inserted in centre comes out slightly sticky
    Cool in pan on wire rack for 15minutes
    Invert onto wire rack, remove wax paper, turn right side up, cool completely
    When it's completely cooled, spread whipped cream with spatula on the brownie and decorate with whole cherries
    Refrigerate (I prefer to eat this at room temperature, it's more moist)

    You may hop to Lena, Joyce and Zoe's sites to view their wonderful chocolate & cherries creations :)

    Thursday, April 28, 2011

    Steamed Cheesy Brownies With Chocolate Chips

    Another recipe to keep - especially when u're a cheese lover :)
    Soft, light, fluffy, cottony cheese brownies - it's a popular cake among Indonesians (it's a modification from the original chocolate version)
    I added some chocolate chips since my family loves chocolate :)
    For some reasons, the chips sank to the bottom but some survived in the middle - I wonder if mixing a little plain flour to the chocolate chips can help them to stay at their original place?
    Anyhow, the taste is really yummilicious! And the best part, it's easy to make :)

    You see the chocolate chips at the bottom:

    And those managed to hang on at the middle part:

    What you need:

    A (beat til pale and thick+creamy)
    3 eggs
    1 tbsp ovalette
    100g caster sugar

    B (sieve together)
    60g plain flour
    20g cornflour
    1 tsp salt
    40g milk powder

    C (beat til well incorporated and smooth)
    250g cream cheese
    50g butter

    Process each group of ingredients
    Fold in B into A til well mixed
    Add in C - mix well with wooden spoon
    Pour half the batter onto an 8 inch round pan which has been buttered and sprinkled with plain flour, sprinkle with chocolate chips on the batter
    Pour the remaining batter, arrange some more chocolate chips at the top
    Heat steamer, put a plate on the steamer, and put the pan on the plate (this is to avoid water below going up to the pan when it's bubbling) 
    Let it steam without cover for the first 5 minutes - on medium heat
    Continue steaming with cover for the next 30 minutes - on medium heat
    Take out from steamer once it's cooked

    Note: please wrap the cover with clean cloth to prevent the steam drops on the cake during steaming process

    I'm submitting these soft cheesy brownies to Aspiring Bakers#6: Say Cheese! (April 2011) hosted by Jean from Noms I Must at this LINK

    Sunday, February 20, 2011

    Fudgy Brownies Pop

    Finally I made this - supposedly Valentine's Day gift for Abby and Ian, but delayed for a week cos of my health issue last week :)


    I fell in love with these pops when I saw them in Foodbuzz somewhere in early February
    They're so pretty and cute!
    When Abby saw the pictures, she said, I want those lollipops, mummy! :)

    This is how to make them:

    ready to eat fudgy brownies - cooled
    heart shaped cookie cutter
    dark chocolate cooking bar or candy melts
    decorative sprinkles
    lollipop sticks
    styrofoam block

    Crumble brownies in a large bowl using hands, shape into heart shaped cookie cutter, place on lined baking pan
    Melt chocolate or candy melts according to instruction
    Dip the sticks into the melted chocolate and gently insert the stick into each of the heart shaped brownie
    Place them in the freezer for a few minutes to harden
    Place the remaining of the melted chocolate in a narrow bowl or cup
    Dip each brownie pop into melted chocolate, gently tap on the side to remove excess chocolate
    Place each pop standing upright onto styrofoam block and let them dry completely
    (this is a challenge in hot and humid Singapore weather - I placed them in an aircon room)
    If using sprinkles, do immediately after dipping
    I used pink color icing pen to draw on the pop

    Besides heart shape, I did round shape too cos Ian kept on telling me that lollipops are round! LOL


    Honestly, to make these pops is not easy at all, at least for me, whom always sucks in decorating my baking hehe... But it's all worth it when looking at the expression in my kids face...wow, mummy! You made lollipop cakes!!! :P

    Okay now, about the brownies for the pops....

    I wanted to use my usual recipe for the brownies but then I saw this recipe from Baking Library, and decided to give it a try - the brownies looked so sinfully rich and fudgy, my kind of brownies :)
    Indeed it is!!!
    It's so fudgy that I didn't need to add any additional frosting to mould them into heart shape - make my job easier :)

    What you need:

    To make the brownies:
    185g dark chocolate (I use 70%) - melted and cooled
    110g unsalted butter - softened
    220g brown sugar
    1 tsp vanilla essence
    200g eggs (I use 4 large eggs)
    75g plain flour
    50g cocoa powder

    Preheat oven to 180degC
    Cream butter and sugar on medium speed for about 3-5 minutes. As there is a larger proportion of sugar to butter, the mixture will not end up being fluffy
    Slowly add in eggs by the tablespoon to the creamed butter, beating the mixture well before incorporating the next tablespoon
    Beat in melted chocolate and mix well. Scrape sides and bottom of bowl often to ensure even mixing
    Stir in the dry ingredients with a spatula or wooden spoon to get a smooth batter
    I used 22cm square pan, pour the batter onto the pan and level the surface. Bake for around 20 minutes at 180 degrees C. The top should be crusty and dull. When lightly pressed on the surface, the underneath feels semi-firm. Cool baked brownie in tin for 45mins before removing to cool on wire rack

    This was the brownies before the make over - yum!!!


    I am submitting these cute little pops to "Aspiring Bakers #4: Love In The Air! (Feb 2011)", hosted by Cuisine Paradise at this LINK