Friday, April 30, 2010

Roasted Vegetable, Feta Cheese, and Fresh Basil Pizza

It was another busy day and I didn't feel like making a big meal for dinner. I had pizza dough to use up in the refrigerator so I decided to make a pizza. I roasted some mushrooms, tomatoes, and red onion in the oven before putting them on the pizza then added the feta cheese and fresh basil on top right before serving. It turned out so delicious, I can't believe I've never tried roasted veggie pizza before. This was a simple, quick, and delicious dinner with very little clean up.

Roasted Vegetable, Feta Cheese, and Fresh Basil Pizza:
Recipe and photos by For the Love of Cooking
  • Cooking spray
  • Corn meal
  • 1 ball of pizza dough (I used store bought)
  • 1 container of pizza sauce (Trader Joe's is really good)
  • 1-2 cups of mozzarella cheese, shredded
  • 15 cherry tomatoes, cut in half
  • 8 oz mushrooms, sliced thickly
  • 1/2 red onion, sliced thickly
  • 1 large clove of garlic, minced
  • 6-7 fresh basil leaves, chopped
  • 1/4 cup of feta cheese crumbles (I used reduced fat)
  • Sea salt and freshly cracked pepper
Preheat the oven to 450 degrees. Line a baking sheet with tinfoil and coat it with cooking spray. Add the tomato halves, mushroom slices, and red onion slices to the baking tray. Drizzle with a bit of olive oil and season with sea salt, dried oregano, and freshly cracked pepper, to taste.

Roast in the oven for 15 minutes. Remove from the oven and let cool. Spread dough on a pizza sheet that has been coated with cooking spray and a sprinkle of corn meal. Spoon the sauce on the dough and spread evenly. Sprinkle the mozzarella cheese all over followed by the roasted vegetables. Next, carefully spread the minced garlic all over the pizza being careful not to drop in large clumps.

Place into the oven and bake for 15-20 minutes or until cheese is bubbling and the crust is golden brown. Add the feta cheese and the fresh basil. Enjoy.

Thursday, April 29, 2010

General Tsao Chicken with Brown Rice and Broccoli

I didn't have time to do an elaborate recipe today after taking the kids to swimming lessons after school. I found this General Tsao sauce at Trader Joe's and decided to give it a try. I am so glad I did! It was very flavorful and spicy on the chicken and my husband and I both loved it. I served this chicken with brown rice and steamed broccoli. The sauce was too spicy for my kids, so I served their chicken with teriyaki sauce and they loved it. This was a quick, simple, and healthy meal that we all enjoyed.

General Tsao Chicken with Brown Rice and Broccoli:
Recipe and photos by For the Love of Cooking.net
  • 2 tsp olive oil
  • 5 chicken thighs, fat removed
  • Sea salt and freshly cracked pepper, to taste
  • Garlic powder, to taste
  • General Tsao Stir Fry Sauce (or teriyaki sauce)
  • Brown Rice, cooked per instructions
  • Fresh broccoli crowns, steamed until tender
  • Green onions, chopped (optional)
Cook the rice, per instructions. Heat the olive oil in a skillet over medium heat. Season the chicken thighs with sea salt, freshly cracked pepper, and garlic powder. Place the chicken into the hot skillet and cook for 5 minutes per side or until cooked through. Add sauce, to taste and simmer for 1 minute. Remove the chicken from the stove and set aside for a few minutes to rest before serving. Steam the broccoli until tender while the chicken cooks and rests. Fill plate with rice, broccoli and chicken. Serve with extra sauce and green onions if desired. Enjoy.

Wednesday, April 28, 2010

Black Beans with Tomato, Onion, Cilantro, and Garlic


We eat Mexican food often and I find that black beans are a healthy side dish that my entire family enjoys. I sometimes serve them simply seasoned with salt and pepper and other times I kick them up a notch by adding some spices, herbs and vegetables. Using dried black beans is best but it's not always convenient so when I am pressed for time I will use canned black beans. This recipe took minutes to make and tasted fantastic served with the Citrus Marinated Pork Tacos.

Black Beans with Tomato, Onion, Cilantro, and Garlic:
Recipe and Photos by For the Love of Cooking.net
  • 1 can of black beans, rinsed and drained
  • 1 tbsp sweet yellow onion, diced finely
  • 1 tbsp grape tomatoes, diced
  • 1 tbsp fresh cilantro, diced
  • 1 clove of garlic, diced
  • 1 small jalapeño, seeded and diced finely
  • Pinch of cumin
  • Pinch of dried oregano
  • Sea salt and freshly cracked pepper, to taste

Place the rinsed and drained black beans into a small pan over low. Add the onion, tomatoes, cilantro, garlic, jalapeño, cumin, oregano, sea salt, and freshly cracked pepper, to taste. Stir well and taste, re-season if needed. Cook until the beans and hot then serve immediately. Enjoy.


Tuesday, April 27, 2010

Citrus Marinated Pork Tacos with Pineapple Salsa and Guacamole

We recently went out to dinner at one of our favorite Mexican restaurants and I had the best pork tacos I've ever had. I decided to try to re-create them at home. This recipe was fun to make and the tacos tasted fantastic. I wanted to use an orange in the marinade but realized my son ate the last one for lunch so I used 4 clementines instead and they worked great. I loved the citrus flavor of the pork with the sweet pineapple salsa, the creamy guacamole and the salty cotija cheese. These are my new very favorite tacos and I can't wait to make them again. They were a huge hit with my entire family.

Citrus Marinated Pork Tacos with Pineapple Salsa and Guacamole:
Recipe and photos by For the Love of Cooking.net
Inspired by Chevy's

Marinade:
  • 1 pork tenderloin, silver skin removed and diced
  • 2 tsp olive oil
  • Zest and juice of 1/2 lemon
  • Zest and juice of 1/2 lime
  • Zest and juice of 1 orange or 4 clementines
  • 1 clove of garlic, minced
  • 1 tbsp fresh cilantro, chopped
  • 1/4 tsp oregano
  • 1/4 tsp paprika
  • Sea salt and freshly cracked pepper, to taste
Combine the olive oil, the juice and the finely chopped zest of the lemon, lime, and orange, garlic, cilantro, oregano, paprika, sea salt, and freshly cracked pepper, to taste. Combine the ingredients and taste, re-season if needed. Add the diced pork and let it marinate in the refrigerator for at least 1 hour. Remove from the refrigerator 20 minutes prior to cooking.

Heat a skillet over medium high heat and coat with cooking spray. Once the pan is HOT add the pork and cook for 1-2 minutes before stirring and cooking for an additional 2-3 minutes or until cooked through.

Other Ingredients:
Cook tortillas in a dry (no oil) hot pan for 45 seconds on both sides, until soft and pliable. Place cooked tortilla on a plate then spoon the pork on top, add pineapple salsa, guacamole and cotija cheese. Serve immediately. Enjoy.

Monday, April 26, 2010

Pineapple Salsa

I really like adding the sweetness of fruit to savory dishes. I picked up a fresh pineapple at the store and decided to make a salsa with it. It's extremely easy to make and tastes so good. I used this on top of tacos but it would also be wonderful served on top of chicken, fish, or pork as well.

Pineapple Salsa:
Recipe and Photos by For the Love of Cooking.net
  • 1 small pineapple, cored and diced (see instructions here)
  • 1/2 cup cilantro, chopped finely
  • 1 tbsp red onion, diced finely
  • 1 small jalapeño, seeded and diced finely
  • 1 green onion, chopped finely
  • Zest and juice of 1/2 lime
  • Dash of sugar
  • Sea salt and freshly cracked pepper, to taste
Dice the pineapple and vegetables. Combine all of the ingredients in a bowl and stir until well mixed. Set aside on the counter for an hour or so to let the flavors combine. Enjoy.

Saturday, April 24, 2010

Top 50 Mom Food Bloggers

For the Love of Cooking was recently awarded one of the Top 50 Mom Food Bloggers on Babble.Com - how cool is that? Anyway, if you feel like voting for me, hop over to the link and click on the thumbs up. Hope you are having a great weekend!

Friday, April 23, 2010

Mushroom, Asparagus, Bacon, and Tomato Quiche with a Potato Crust

I wanted something easy for dinner that would use the remaining veggies I had in the refrigerator so I decided to make a potato crust quiche. I love that this quiche is really easy to make and that you can use any ingredients you have on hand. I think this is my new favorite flavor, I really loved the asparagus and mushrooms with the bacon. You can serve this quiche for breakfast, brunch, lunch, or dinner and the leftovers taste fantastic. I highly recommend this recipe.

Mushroom, Asparagus, Bacon, and Tomato Quiche with a Potato Crust:
Recipe and photos by For the Love of Cooking.net
  • 1 1/2 - 2 russet potatoes, sliced very thin
  • 1 tsp olive oil (or reserved bacon grease)
  • 4 slices of lean bacon, cooked and crumbled
  • 1/2 sweet yellow onion, diced
  • 1 cup of button mushrooms, sliced
  • 4 asparagus spears, diced
  • 1 clove of garlic, minced
  • Handful of grape tomatoes
  • 1/2 cup of cheddar cheese, shredded
  • 7-8 eggs, beaten
  • 1/4 cup of milk
  • Sea salt and freshly cracked pepper, to taste
Preheat the oven to 375 degrees. Coat a pie dish with cooking spray. Layer thin slices of potato all over the edges and bottom of pan, making sure to overlap them. Spray with cooking spray and bake in the oven for 7-10 minutes. Remove from oven and set aside.


Cook the bacon in a skillet over medium heat until crisp. Remove bacon from pan and place on paper towels. Chop bacon into crumbles and set aside. Use the grease from the bacon or the olive oil in the same skillet over medium heat. Sauté the onions for 3-4 minutes before adding the mushrooms. Continue cooking for 3-4 minutes before adding the asparagus and garlic; cook for another 1-2 minutes then remove from heat.

Sprinkle the mushroom mixture on top of the potatoes then add the bacon, tomatoes, and half of the cheese. Beat the eggs with the milk and season with sea salt and freshly cracked pepper. Pour the egg mixture on top of the bacon and vegetable mixture.

Place in the oven and bake for 30 minutes then add the other half of the cheese and cook for a few minutes more or until a tester inserted in the center of the quiche comes out clean - don't overcook. Remove from oven and let cool for a few minutes before slicing. Enjoy.

Thursday, April 22, 2010

Linguine with Red Clam Sauce

My kids love fresh clams so I picked some up from the grocery store and decided to make linguine with clams. I wanted to make the dinner light and healthy so I made a spicy red sauce instead of a butter sauce. It was a very simple recipe to make and tasted fantastic. The sauce wasn't too spicy for the kids and they gobbled it up. The leftovers the next day were delicious and very flavorful too.

Linguine with Red Clam Sauce:
Recipe and photos by For the Love of Cooking.net
  • 4 oz of pancetta, chopped
  • 1-2 tsp olive oil
  • 1/2 sweet yellow onion, diced
  • 3-4 large cloves of garlic, minced
  • 28 oz can of whole or crushed tomatoes
  • 1/2 tsp dried oregano
  • 1 tsp fennel seeds, crushed
  • 1/4 tsp crushed red pepper
  • Sea salt and freshly cracked pepper, to taste
  • 5-6 fresh basil leaves, chopped (divided)
  • 2 tbsp fresh parsley, chopped (divided)
  • 10 oz linguine, cooked per instructions
  • 1 lb fresh clams, cleaned
Cook the pancetta in a Dutch oven over medium heat for 3-4 minutes or until browned, remove from the Dutch oven to a paper towel. If there isn't enough oil in the Dutch oven from the pancetta, add olive oil. Add the onion and cook stirring frequently, until soft and tender, about 3-4 minutes. Add the seasonings and minced garlic, stirring constantly for 1 minute. Add the crushed tomatoes or the juice from the whole tomatoes. Place the immersion blender into the can and crush the whole tomatoes before adding them to the Dutch oven. Add half the basil and parsley then stir. Taste and re-season if needed. If you like a sweeter sauce, add a bit of white sugar, to taste. Let the sauce simmer covered for 30 minutes.

Go through your fresh clams, if any of them are open, tap them lightly on the counter and if they don't close shut, the clams are dead - DON'T EAT THEM. Scrub the clams lightly in cold water. Keep the clams in the refrigerator until ready to use.

Cook the pasta per instructions. While the pasta is cooking, add the fresh clams to the sauce by the handful and simmer for 4-6 minutes (don't dump the bowl of clams into the sauce because there could be sand in the bottom of the bowl). If there are any clams that did not open, throw them out. Toss the cooked linguine with the sauce and clams until evenly coated. Top with the remaining basil and parsley and serve. Enjoy.


Wednesday, April 21, 2010

BBLTA - Bacon, Blue Cheese, Lettuce, Tomato and Avocado Sandwich

I made these sandwiches for lunch today and my son and I LOVED them. I have always loved BLT sandwiches and can't believe I've never added blue cheese to them before now. I used avocado instead of mayonnaise, a flavorful low fat blue cheese, really lean bacon, and a sandwich thin to keep this sandwich a bit healthier. I loved the crunchy bacon with the soft tomatoes and the crisp lettuce with the creamy cheese and avocado. This sandwich is quick and very easy to make and is filled with wonderful flavors and textures.

BBLTA - Bacon, Blue Cheese, Lettuce, Tomato, and Avocado Sandwich:
Recipe and photos by For the Love of Cooking.net
  • 2 slices of lean bacon (or turkey bacon)
  • Tomato slices
  • 1 tbsp of low fat blue cheese (more if you want)
  • Avocado slices
  • Romaine lettuce
  • Sandwich Thin
  • Freshly cracked black pepper, to taste
Cook the bacon in a skillet over medium heat until crisp. Place on a paper towel. Toast your sandwich thin. Spread a few avocado slices onto each side of the sandwich thin and spread until evenly coated. Layer the sandwich with the lettuce, bacon, tomato slices, blue cheese crumbles then season with freshly cracked black pepper, and top with the other sandwich thin. Enjoy.

Tuesday, April 20, 2010

Homemade Cinnamon and Brown Sugar Pop Tarts

I surprised my kids with some freshly made pop tarts for breakfast. They were so excited when they found out they were filled with cinnamon and brown sugar. The pop tarts were extremely quick and easy to make and they tasted fantastic. My kids and husband gobbled them right up and enjoyed every last bite. I served these pop tarts with a Yogurt and Fruit Parfait and turkey sausage for a fun and tasty breakfast.

Homemade Cinnamon and Brown Sugar Pop Tarts:
Recipe and photos by For the Love of Cooking.net
  • 1 premade pie crust
  • Butter, softened
  • 1/2 cup of brown sugar
  • 1 1/4 tsp ground cinnamon
  • 1 egg, mixed well
Preheat the oven to 400 degrees. Line a baking sheet with a silpat mat.

Place the dough on top of a cutting board. Cut the dough into four squares. Roll the cut off strips of dough out and make one more square. Spread a small amount of butter on one side of the square. Mix the cinnamon and sugar mixture until well combined. Spoon a bit of cinnamon mixture on top of the butter.

Fold the dough in half and gently seal the edges with your fingers. Take a fork and crimp the edges of the pop tart closed.

Slice a little vent into the top of each pop tart. Brush the tops of each pop tart with the egg wash. Sprinkle each pop tart with some of the raw brown sugar and cinnamon mixture.

Place into the oven and bake for 15 minutes or until golden brown. Remove from the oven and cool on a baking rack. Serve warm. Enjoy.

Monday, April 19, 2010

Slow Roasted Chicken with Cilantro-Citrus Butter

My daughter is finally on the mend from her terrible cold but now my husband and son are sick. I decided to roast a chicken and loaded it up with citrus to get as much vitamin c in my family as possible. I slow roasted the bird and my house smelled fantastic all afternoon - I love that. I served this chicken with Roasted Tomatoes with Cotija Cheese and Cilantro and Lime Rice for a tasty and healthy dinner that we all enjoyed.

Slow Roasted Chicken with Cilantro-Citrus Butter
Recipe and photos by For the Love of Cooking.net
  • 5 lb free range chicken
  • 1-2 tbsp butter
  • 2 tbsp fresh cilantro, chopped
  • Zest of one orange
  • Zest of one lemon
  • Zest of one lime
  • 1 clove of garlic, minced
  • Sea salt and fresh cracked pepper, to taste
Preheat the oven to 275 degrees. Clean chicken and pat dry. Mix the cilantro, minced garlic, orange, lemon, and lime zest with the butter, mix well. Place the chicken on a roasting rack in a roasting pan. Spread a bit of the butter mixture over the back of the chicken. Cut the orange, lemon, and lime in half and squeeze the juice from one half of each all over the back of the chicken. Season with sea salt and freshly cracked pepper then flip the bird over breast side up. Carefully, lift the skin over the breasts and rub some of the butter mixture directly onto the breast meat. Then rub the remaining butter mixture over the skin of the bird. Squeeze juice from the other half of the orange, lemon, and lime over the skin. Season with sea salt and freshly cracked pepper. Place half of the orange, lemon, and lime inside the cavity along with more cilantro and stems.

Place the meat thermometer into the thickest part of the thigh, making sure not to touch bone. Roast uncovered for 3 1/2 - 4 hours until the meat thermometer reads 180 degrees. I start basting my bird after 2 hours and repeat every 1/2 an hour after that. My chicken turns out sticky and slightly crispy. If you want crispy skin then don't baste for the last hour and turn the heat up to 350 degrees for the last 5 minutes of cooking. Remove from oven and let the bird rest for AT LEAST 10 minutes before carving. Enjoy!


Friday, April 16, 2010

Roasted Garlic and Tomato Soup with Fresh Basil

My daughter was home from school with a terrible cold so I decided to make a pot of soup. I found this recipe on Suzie the Foodie and decided to give it a try. I loved the flavor the roasted tomatoes and garlic gave to this soup as well as the fresh basil. It was hearty, healthy and very filling. My entire family enjoyed this soup, especially me. I served it with Marjie's Cool Rise French Bread and my House Salad for a delicious meal.

Roasted Garlic Tomato and Basil Soup:
Adapted recipe and photos by For the Love of Cooking.net
Original Recipe by Suzie the Foodie and Oprah Magazine Cookbook
  • Roasted garlic
  • Roasted grape tomatoes with basil
  • 1 tsp olive oil
  • 1/2 sweet yellow onion, diced
  • 2 carrots, diced
  • 2 stalks of celery, diced
  • 2 28 oz cans of whole tomatoes with basil
  • 6-7 fresh basil leaves, chiffonade
  • 1 tsp dried oregano
  • 1 bay leaf
  • Sea salt and freshly cracked pepper, to taste
  • 1-2 tsp balsamic vinegar
  • 1/2 cup of vegetable or chicken broth
  • White sugar, to taste (optional)
Roast the garlic and tomatoes (click links above for instructions).

Heat the olive oil in a large Dutch oven over medium heat then add the onion, carrots, and celery. Cook, stirring frequently for 4-5 minutes. Squeeze the roasted garlic into the mixture then add the roasted tomatoes, two cans of tomatoes, basil, oregano, bay leaf, vinegar, and broth. Season with sea salt and freshly cracked pepper, to taste. Let the soup simmer for 2 hours. Remove the bay leaf then blend the soup using an immersion blender until thoroughly mixed. Taste the soup and add sugar if you want your soup slightly sweet, more sea salt, or freshly cracked pepper if needed. You can also add 1/2 cup of milk or cream if you want a richer and creamier soup. If you want a thin soup, pour through a strainer. If you want a heartier soup, leave as is. Serve and enjoy.

Thursday, April 15, 2010

Marjie's Cool Rise French Bread

I was making a pot of soup for dinner and I wanted to serve it with fresh baked bread. I have been wanting to try Marjie's Cool Rise French Bread for awhile so I thought this would be the perfect time to do it. I used a bread machine but if you don't have one, Marjie tells you what to do here. It was so simple to make and it tasted fantastic. Thanks for another great bread recipe Marjie.

Marjie's Cool Rise French Bread:
Recipe and photos by For the Love of Cooking
Original recipe by Modern Day Ozzie and Harriet
  • 3/4 cups warm water
  • 1 packet of yeast
  • 2 1/4 cups of flour
  • 1 1/2 tsp salt
  • 1 1/2 tsp sugar
  • Olive oil
Place the warm water into the pan of your bread machine then sprinkle the yeast on top. Add the flour, salt, and sugar. Turn your bread machine on to the dough cycle and let it run for 10 minutes. Remove the dough (it will be sticky) and place on a well floured surface, knead the dough for 1-2 minutes (add more flour if needed) then place on a baking sheet lined with a silpat mat that has been sprayed with cooking spray. Form the dough into a loaf then let it sit for 10 minutes. Brush the top of the dough with a bit of olive oil then cover with waxed paper and place into the refrigerator for 2 - 24 hours.

When you are ready to bake your bread, take it out of the refrigerator and uncover it. Preheat the oven to 375 degrees. Place the bread into the oven and bake for 18-22 minutes or until golden brown. Remove from the oven and let cool for a bit before slicing. Enjoy.

Wednesday, April 14, 2010

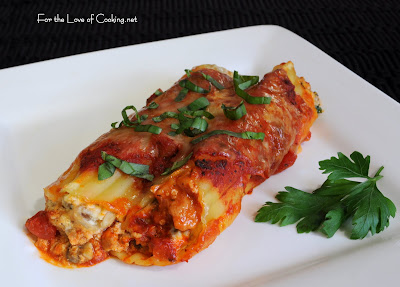
Italian Sausage and Mushroom Stuffed Manicotti

We had friends coming for dinner and I needed to use up the turkey Italian sausage and mushrooms I had in the refrigerator so I decided to make manicotti. I found some marinara in the freezer so this meal turned out to be pretty easy to make. It was hearty, delicious and a big hit with everyone, kids included. This will be on our dinner table again and again.

Turkey Italian Sausage and Mushroom Stuffed Manicotti:
Recipe and photos by For the Love of Cooking.net
  • 1 tsp olive oil
  • Turkey Italian sausage links, casings removed
  • 1/2 sweet yellow onion, diced
  • 8 oz button mushrooms, chopped
  • 4-5 cloves of garlic, minced
  • 1/2 tsp dried oregano
  • Sea salt and freshly cracked pepper, to taste
  • 15 oz Ricotta cheese (I used part skim)
  • Dash of fresh nutmeg, grated
  • 2 tbsp fresh parsley, chopped
  • 5-6 fresh basil leaves, chiffonade (divided)
  • 4 tbsp Parmesan cheese (divided)
  • Manicotti shells, cooked per instructions
  • 3 cups of marinara sauce (divided)
  • 1 1/2 cup mozzarella cheese (divided)
Preheat the oven to 350 degrees. Coat a large glass baking dish with olive oil cooking spray then pour 1 cup of marinara and coat entire baking dish.

Heat the olive oil in a skillet over medium heat. Once hot, add the turkey sausage removed from casing. Cook for 1-2 minutes, crumbling the sausage with a spatula. Add the onions and mushrooms then continue to cook for 3-4 minutes. Once the meat is cooked through and crumbled and the onions are tender, add the minced garlic and cook, stirring constantly for 1 minute. Remove from heat and let cool.

Cook the manicotti noodles per instructions and set aside to cool. In a large bowl add the cooled meat mixture, ricotta cheese, grated nutmeg, parsley, basil, 1/4 cup mozzarella cheese, 2 tablespoons of Parmesan cheese, then mix thoroughly. Place the mixture into a large zip lock bag and cut a hole in the corner of the bag. Pipe filling into each manicotti shell (I pipe a bit into each side) then place into the baking dish. Continue process until you are out of filling and shells. Pour the remaining marinara sauce on top of the manicotti then top with the remaining mozzarella cheese and Parmesan cheese.

Cover the baking dish with a piece of tin foil and place in the oven to bake for 30 minutes. Remove tin foil and cook for an additional 5 minutes. Remove from oven and let cool for 7-10 minutes. Top with chopped basil and serve. Enjoy.

Tuesday, April 13, 2010

Zucchini and Walnut Muffins

I needed to make an after school snack and after looking through the refrigerator, I decided to make zucchini muffins so I could use up the last bit of zucchini I had. I wanted to make the muffins a bit healthy so I used mostly whole wheat flour and I used canola oil instead of butter. This was a really fun and easy project to do with my son and he had so much fun mixing all the ingredients together. The muffins turned out moist and delicious - the perfect after school snack. Both of my kids gobbled them up and asked for seconds. They also made terrific breakfast muffins the following morning.

Zucchini and Walnut Muffins:
Recipe and Photos by For the Love of Cooking.net
  • 2 cups of whole wheat flour
  • 1 cup of flour
  • 1 tbsp baking powder
  • 1 tsp salt
  • 2 tsp cinnamon
  • 1 tsp pumpkin pie spice
  • 1/2 cup of brown sugar
  • 1/4 cup of white sugar
  • 2 eggs
  • 1/4 cup canola oil
  • 3/4 cup 2% milk
  • 1 tsp vanilla
  • 1 1/2 cup zucchini, grated
  • 1 cup walnuts, chopped
Preheat the oven to 350 degrees. Coat a muffin tray with cooking spray.

Combine the flours, baking powder, salt, cinnamon, and pumpkin pie spice in a small bowl. In a separate bowl, combine the sugars, eggs, oil, milk, and vanilla. Slowly combine the dry ingredients into the wet ingredients. Once the mixture is well combined, fold in the grated zucchini and chopped walnuts.


Spoon the mixture into the the prepared muffin tray.

Place into the oven and bake for 18-20 minutes or until a tester inserted into the center of the muffins comes out clean. Let cool on a rack for 10 minutes. Serve plain or slathered with butter. Enjoy.