Wednesday, October 28, 2009

Recipe Revisited - Happy Halloween


For the first time ever, I am revisiting a recipe. I am doing this for two reasons...
  1. It's a fun way to make lunch a little more special for Halloween - your kids will love it!
  2. I have a terrible flu and have no energy to cook or blog. I will be taking the next few days off to rest and recuperate. I hope you all have a fun and spooky Halloween. See you next week.

Recipe Revisited from October 2008:

I wanted to make a fun Halloween lunch this week for my kids so I decided to make a jack-o-lantern sandwich, bugs on a log and a silly face. They absolutely loved it and gobbled up every last bite. I loved seeing their faces when I gave them their lunches.

Jack-O-Lantern Sandwich:
  • Whole Wheat bread
  • Cheddar cheese
  • Turkey
  • Mayonnaise
  • Mustard

Bugs on a log:

  • Celery
  • Peanut butter
  • Raisins

Silly face:

  • Cucumber slices
  • Cherry tomatoes, sliced in half
  • Strawberry
  • Clementine or Mandarin orange slices


Maple and Brown Sugar Acorn Squash

I had an acorn squash in the refrigerator that I needed to use up. I usually cook them with butter, cinnamon and nutmeg but this time I decided to try maple syrup and brown sugar. It was so delicious! I love the flavor of the maple syrup with the creamy and delicious squash. It not only looks really pretty but it tastes wonderful too. I was shocked that my kids didn't care for this dish since they love maple syrup, I think it may be the texture. My husband and I both really loved it.

Maple and Brown Sugar Acorn Squash:
Recipe and photos by For the Love of Cooking.net
  • 1 acorn squash
  • 1 tbsp butter
  • 1-2 tbsp brown sugar
  • 1 tbsp maple syrup
  • Sea salt and freshly cracked pepper, to taste
Preheat the oven to 350 degrees. Slice each squash lengthwise in half. Scrape out the seeds and rinse.

Spread the butter all over each half of the squash. Sprinkle with brown sugar then drizzle with maple syrup. In a deep baking dish, add enough water to cover the bottom of the dish. Place the squash facing up in the dish.

Cover with tin foil and bake for 45 minutes or until fork tender. Take off the tin foil and turn the oven to broil so you can brown the tops of each squash - watch carefully so it doesn't burn. You can slice into chunks or scoop out the flesh and eat it like mashed potatoes - whatever suits your fancy. Enjoy.

Tuesday, October 27, 2009

Sweet and Spicy Flank Steak


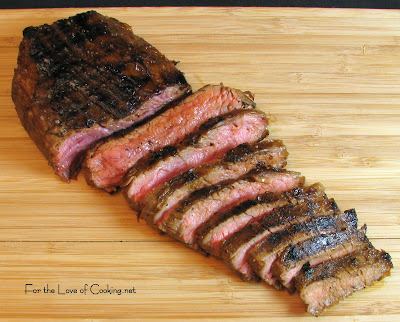
One of the perks of having a food blog is getting to try new products. I was sent a couple of bottles of Country Bob's All Purpose Sauce recently and decided to marinate some flank steak in it. I lightly seasoned the steak with sea salt and pepper, rubbed some minced garlic into the meat then drizzled it with Country Bob's sauce. I let it sit in a large zip lock for 4 hours before cooking it in my grill pan. I have to say - I LOVE THIS SAUCE. It's really flavorful with a hint of sweet and spicy without being overpowering. The steak tasted amazing and we all loved it. My kids both asked for seconds and ate every last bite. I look forward to using this sauce with hamburgers, chicken and pork. Thanks for the great sauce.

Sweet and Spicy Flank Steak:
Recipe and photos by For the Love of Cooking.net
  • Flank Steak
  • Sea salt and freshly cracked pepper, to taste
  • 1-2 cloves of garlic, minced
  • Country Bob's All Purpose Sauce
Lightly season the steak with sea salt and freshly cracked pepper. Rub the minced garlic all over the steak, place the flank steak in a large zip lock bag then drizzle a few tablespoons of sauce over the top. Rub and coat the meat evenly with the sauce. Seal and place in the refrigerator for 4 hours.

Let the meat sit at room temperature for 15-20 minutes before grilling it. Heat a large grill pan over medium high heat. Coat the pan with cooking spray. Place the flank steak in the hot pan and cook for 4-5 minutes on each side for medium rare. Let the meat "rest" for 5 minutes before slicing into thin slices against the grain. Serve with more Country Bob's sauce for dipping. Enjoy.

Monday, October 26, 2009

Warm Spinach Salad with Sausage and Potatoes

I adapted a recipe I found in Real Simple magazine to make one of the most delicious salads I've ever had. I roasted some onions, baby potatoes, mushrooms, garlic, tomatoes, red onion and asparagus in the oven. I tossed the spinach with the warm vegetables, sausage, feta cheese and a balsamic and mustard dressing. It was really quick and simple to make and tasted so unbelievably good. My kids, husband and I all loved this meal and gobbled up every last bite. I look forward to making this over and over again. Try this recipe, I think you'll love it!

Warm Spinach Salad with Sausage and Potatoes:
Adapted recipe and photos by For the Love of Cooking
Original recipe from Real Simple Magazine
  • 4 garlic and herb chicken sausages
  • 8-10 vine ripe tomatoes, halved
  • 1 red onion, sliced into chunks
  • 1 cup of baby potatoes
  • 1 cup mushrooms, quartered
  • 8-10 spears of asparagus, ends removed
  • 4-5 cloves of garlic (leave skins on)
  • Olive oil, to taste
  • Sea salt and freshly cracked pepper, to taste
  • 12 oz of fresh spinach
  • Feta cheese (not pictured)
Preheat the oven to 400 degrees. Line a baking sheet with tinfoil and coat with cooking spray. Chop the tomatoes in half, quarter the mushrooms and chop the onion. Place the tomatoes, onion chunks, mushrooms, garlic cloves (with skin on), and baby potatoes on the baking sheet. Drizzle with olive oil and season with sea salt and freshly cracked pepper, to taste. Place in the oven and roast for 20-25 minutes, stirring occasionally. Add the asparagus and continue to roast for 10 minutes or until the asparagus and potatoes are fork tender.


While the veggies are roasting, cook the sausage in a skillet over medium heat for 10 minutes or until done.

Balsamic and Mustard Dressing:
  • 2 tbsp balsamic vinegar
  • 3 tbsp olive oil
  • 2 tbsp water (not pictured)
  • 2 tbsp whole grain mustard
  • 1 clove of garlic
  • Sea salt and freshly cracked pepper, to taste
Whisk the vinegar, olive oil, mustard, water, garlic then season with sea salt and freshly cracked pepper, to taste, until well combined.

Once the veggies are out of the oven, carefully remove the skin from the garlic and then slice. Toss the warm veggies and sliced sausages with the spinach and dressing until evenly coated. Top with feta cheese. Serve immediately and enjoy.

Friday, October 23, 2009

Homemade Granola

My son and I spent a rainy afternoon making homemade granola together. I found this recipe at Kiss My Spatula and it looked simple, delicious and fairly healthy. I used walnuts, almonds, coconut and dried cranberries because that's what we had on hand. It was crunchy, slightly sweet with a bit of tartness too. My kids ate this for breakfast with milk and they also had it as an afternoon snack with yogurt, both versions were a big hit. I will never buy granola again.

Homemade Granola:
Adapted recipe and photos by For the Love of Cooking
Original recipe from Kiss My Spatula and Barefoot Contessa
  • 4 cups of oats
  • 1/2 cup of slivered almonds
  • 1/2 cup of walnuts, chopped
  • 1 cup coconut, shredded
  • 3 tbsp brown sugar
  • 3/4 tsp cinnamon
  • 1/2 tsp fresh nutmeg, grated
  • 1/2 tsp salt
  • 1/3 cup canola oil
  • 1/3 cup of honey
  • 1/3 cup of apple juice
  • 1/2 tsp vanilla
  • 1/4 cup of dried cranberries
Preheat the oven to 350 degrees. Line a baking sheet with a silpat.

In a large bowl, stir together the oats, nuts, coconut, brown sugar, cinnamon, nutmeg and salt. In another bowl, whisk together the oil, honey, apple juice and vanilla.

Pour the liquid mixture over the oat mixture and stir with a wooden spoon until evenly coated. Spread granola onto the baking sheet. Place in the oven and bake, stirring every 10 minutes for 30 minutes, or until golden brown.


Remove from oven and let cool completely. Add the cranberries and mix thoroughly.

Store cooled granola in an airtight container for up to 2 weeks. Enjoy.

Thursday, October 22, 2009

Black Bean and Chorizo Soup

My great friend Jen gave me this recipe years ago. My husband and I really love this soup but I don't make it often because it's too spicy for the kids. I recently decided to make a batch and my husband and I both thought it was amazing. It's spicy and so flavorful. Adding sour cream to the soup mellowed out the spice a bit, but it was still too spicy for my kids. I am looking forward to the leftover soup for dinner tonight.

Black Bean and Chorizo Soup:
Adapted recipe and photos from For the Love of Cooking.net
Original recipe from Jen and Epicurious
  • 1 tsp olive oil
  • 4-6 oz of pork chorizo
  • 1 small sweet yellow onion, chopped
  • 4-5 baby bell peppers, chopped
  • 2 large garlic cloves, minced
  • 1/4 tsp dried red hot pepper flakes
  • 1 tsp dried cumin
  • Sea salt and freshly cracked pepper, to tasted
  • 4 cups of chicken broth
  • 3 15 oz cans of black beans, drained and rinsed
  • Cotija cheese, garnish
  • Fresh cilantro, chopped
  • Sour cream, optional
Heat the olive oil in a large Dutch oven over medium heat. Remove the chorizo from the casing and cook for 3-4 minutes, stirring occasionally. Add the onion and bell pepper then continue to cook for 5-7 minutes; season with cumin, red pepper flakes, sea salt and pepper, to taste. Add the garlic and cook, stirring constantly, for 60 seconds. Add broth and two cans of black beans then simmer, partially covered for 30 minutes. Mix some of the soup with an immersion blender. Add the last can of beans and stir. Taste, re-season with spices if needed. Top the soup with cotija cheese and fresh cilantro and/or sour cream. Enjoy.

Wednesday, October 21, 2009

Honey - Ginger Chicken Breasts

I adapted this recipe from one I found in a magazine called Best Chicken Recipes by Cooking Light. My son made the marinade with me - he was so proud of himself (look how cute he looks in the new chefs hat our neighbor Cheryl gave him). This dish was really easy to make and tasted wonderful. Both my kids asked for seconds and gobbled up every last bite, they especially loved the sauce. My husband and I also enjoyed this meal. I served the chicken with rice and steamed broccoli, it was a healthy and delicious meal.

Honey-Ginger Chicken Breasts:
Adapted recipe and photos by For the Love of Cooking.net
Original recipe by Cooking Light

Marinade:
  • 1/3 cup of honey
  • 1 tbsp fresh ginger, minced
  • 1 tbsp fresh lemon juice
  • 1 tbsp cider vinegar
  • 1 tbsp soy sauce
  • 1 tsp toasted sesame oil
  • 1/2 tsp orange zest
  • 1/2 tsp Worcestershire sauce
  • 4 cloves of garlic, minced
  • Juice from 1/2 an orange
  • 2 boneless, skinless chicken breasts, trimmed of fat
Combine the ingredients in a large zip lock bag, seal and shake well. Add the chicken breasts and toss to coat evenly. Place in the refrigerator for at least 2 hours, turning occasionally.

Other ingredients:
  • Cooking spray
  • Sea salt and freshly cracked pepper, to taste
  • 1 tsp cornstarch
  • 1 tsp water
  • Sesame seeds
  • Green onions
Remove chicken from bag, reserving marinade. Heat a large skillet coated with cooking spray over medium heat. Place the chicken breasts in the skillet and cook for 7-8 minutes then flip. (I wiped out the pan with a paper towel when I flipped them so the chicken wouldn't burn from the sugar in the marinade). Cook for an additional 4-5 minutes or until the chicken is cooked and the juices run clear.

While the chicken is cooking, strain the marinade through a sieve, discard the solids. Place marinade into a saucepan; bring to a boil. Cook 3 minutes. Combine the cornstarch and water in a small bowl; stir with a whisk. Add cornstarch mixture to saucepan, stirring with a whisk, cook for 1 minute. Remove from heat.

Let the chicken rest for 5 minutes; slice the breasts into thin strips then drizzle with sauce. Sprinkle the top with sesame seeds and green onions. Serve with more sauce on the side. Enjoy.


Tuesday, October 20, 2009

Peanut Butter and Jelly Thumbprints

My son and I made these cookies while my daughter was at school. They were fun and easy to make, my son especially loved using the mixer. I used raspberry jam with less sugar and whole wheat flour but other than that stuck to Martha Stewart's recipe. They were a fun and tasty after school snack that both my kids LOVED. My husband and I tried one after dinner and we both really loved them too.

Peanut Butter and Jelly Thumbprints:
Adapted recipe and photos by For the Love of Cooking.net
Original Recipe by Martha Stewart
  • 1 1/4 cups of whole wheat flour
  • 1/2 tsp baking powder
  • 1/2 tsp baking soda
  • 1/2 tsp salt
  • 3/4 cup smooth peanut butter
  • 4 oz unsalted butter, softened
  • 1/3 cup packed brown sugar
  • 1/3 cup granulated sugar, plus more for rolling
  • 1 large egg
  • 1 tsp vanilla
  • 1/2 cup reduced sugar raspberry jam
Preheat the oven to 350 degrees.

Combine the flour, baking powder, baking soda and salt. Beat the butter and the peanut butter with a mixer on medium speed until smooth. Add sugars then beat until pale and fluffy. Add the egg and vanilla and beat until incorporated. Reduce the speed to low and add the dry ingredients then mix until combined.
Scoop level tablespoons of dough, and form into balls. Roll each ball in granulated sugar, and transfer to a silpat lined baking sheet, spaced about 2 inches apart.

Bake for 8-9 minutes or until the cookies are puffy. Remove from oven, and make indentions in centers by pressing with the handle of a wooden spoon. Return to the oven for 5-6 minutes, or until golden brown. Transfer to wire racks and let cool completely.

Heat jam in a small saucepan, stirring, until loosened, about 30-45 seconds. Spoon about 1/2 teaspoon into each indention. Store cookies in a single layer. Enjoy.


Monday, October 19, 2009

Chicken and Roasted Garlic Lasagna


We had friends coming for dinner and my dear friend Kyle was running in a race the following day so I wanted to make something healthy yet filled with carbohydrates to give her a boost for the race. I had leftover roasted chicken to use up so I decided to make a lasagna with chicken and roasted garlic. I also used the remaining Roasted Garlic and Basil Marinara I had in the freezer. It was really easy to make and very delicious. I loved the flavor of the chicken with the creamy ricotta cheese. It was a big hit with everyone.

Chicken and Roasted Garlic Lasagna:
Recipe and photos by For the Love of Cooking.net

Chicken Mixture:
  • 2 cups roasted chicken, shredded
  • 2 bulbs of roasted garlic
  • 1/4 sweet yellow onion, diced finely
  • 5-6 baby bell peppers, diced finely (I used red & yellow)
  • 6-7 fresh basil leaves, chopped
  • Dried oregano, to taste
  • Sea salt and freshly cracked pepper, to taste
Prepare the roasted garlic.

Place the shredded chicken, roasted garlic, diced onion, diced bell peppers, chopped basil leaves, oregano, sea salt and freshly cracked pepper to taste on a large cutting board. Chop all the ingredients together and mix thoroughly.

Other Ingredients:
  • 1 (32 ounce) container ricotta cheese (I used part skim fat)
  • 1 egg
  • 5-6 fresh basil leaves, chopped
  • Dried Oregano, to taste
  • Fresh nutmeg, grated, to taste
  • 1/2 cup + 3 tbsp of Parmesan cheese (divided)
  • 9 whole wheat lasagna noodles, cooked per instructions
  • Mozzarella cheese, shredded
  • Roasted Garlic and Basil Marinara

Preheat oven to 375 degrees. Coat a large 9x13 baking dish with cooking spray.

In a large bowl, add ricotta, egg, 1/2 cup of Parmesan cheese, fresh chopped basil, nutmeg, oregano, sea salt and freshly cracked pepper, to taste. Combine until mixed thoroughly. Meanwhile, cook the lasagna noodles per instructions then drain.

Layer a 9 x 13 inch baking pan with just enough sauce to cover the bottom of the pan. Lay three lasagna noodles in the pan. Spread some of the ricotta mixture on the noodles, then spoon some of the chicken mixture on top and sprinkle with a bit of mozzarella; spoon some sauce over the cheese; repeat layering. Finish with a layer of noodles and remaining sauce. Sprinkle with mozzarella cheese, remaining 3 tablespoons of Parmesan cheese and a sprinkle of basil or oregano. Bake covered in a preheated oven at 375 degrees for 30 minutes. Uncover and bake for 15 minutes. Let cool for 5 minutes before slicing. Enjoy.

Friday, October 16, 2009

Hasselback Potatoes

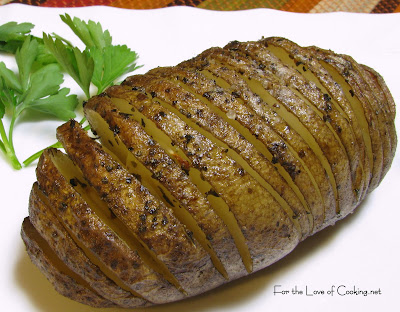
I've always wanted to try these potatoes and decided to finally give them a try after seeing then on What Do I Want To Cook Today. They were extremely easy to make with very little clean up. My entire family enjoyed these delicious potatoes. I look forward to trying them again with different herbs and seasonings. Thanks for the inspiration Jan.

Hasselback Potatoes:
Recipe and photos by For the Love of Cooking.net
  • 3 russet potatoes
  • Olive oil
  • Sea salt and freshly cracked pepper, to taste
  • Dried basil, to taste
  • Garlic cloves, sliced into thin slivers
Preheat oven to 425 degrees. After washing the potatoes well, thinly slice each potato, being careful not to cut all the way through. (Place the potato on a large serving spoon so you won't cut all the way through).

Season each potato with basil, sea salt and freshly cracked pepper to taste. Place a thin slice of garlic between each layer. Place the potatoes in a baking dish and drizzle with olive oil.

Bake for 1 hour or until the potato is tender. Serve with butter and sour cream if desired. Enjoy.

Thursday, October 15, 2009

Pork Tenderloin in an Apple Maple Brine

I finally tried using a brine for my pork tenderloin before cooking it and I can't believe I waited so long. It made this pork so tender, juicy and flavorful. I let it sit in the brine for nearly 8 hours before rinsing it and patting it dry. I then seasoned the pork tenderloin with only freshly cracked pepper because I wanted to taste the flavors from the brine. There were subtle hints of salt, maple and apple...it was so good. My kids could not get enough of this delicious pork and my husband and I loved it as well. I look forward to trying different brine recipes in the future for chicken, pork, and turkey.

Pork Tenderloin in an Apple Maple Brine:
Recipe and photos by For the Love of Cooking.net
Adapted from RecipeZaar
  • 3 1/2 cups of hot water
  • 1/4 cup coarse sea salt
  • 1 cup apple juice
  • 1/4 cup maple syrup
  • 2 tbsp brown sugar
  • 1 tbsp cracked black peppercorns
Stir the hot water and salt together until the salt is dissolved. Add the apple juice, syrup, sugar and pepper. Pour brine into a large zip lock bag and seal. Place bag into a large bowl of ice water to cool down.

Trim any excess fat from the meat and remove the silver skin carefully. Once the brine is cool, submerge the pork in the brine, making sure the meat stays under the surface during curing (use a heavy plate to weigh it down if necessary). Refrigerate the pork in the brine for 6-8 hours.

Preheat the oven to 425 degrees. Heat a large ovenproof skillet coated with cooking spray over medium high heat. Remove pork from brine and rinse then pat dry. Season with freshly cracked pepper. Add pork to the skillet, cook 6 minutes, browning on all sides. Place pan in the oven, and bake for 10-15 minutes or until meat thermometer reads 155-160 degrees (medium) or until desired degree of doneness. Let stand 5 minutes before slicing.


Wednesday, October 14, 2009

Cinnamon Crescent Rolls

I used half the container of the crescent rolls to make my kids the Chocolate and Peanut Butter Filled Crescent Rolls for an afternoon snack. I decided to use the remaining crescent rolls with butter, cinnamon and sugar for a cinnamon roll treat the following day. My kids wanted to make them on their own and they did such a great job! They were a bit messy to make but so much fun. The cinnamon crescent rolls tasted AMAZING (they shared a bite with me). This is such a simple and delicious after school treat for kids and it makes them really, really happy. Thanks again for the inspiration Cathy.

Cinnamon Crescent Rolls:
Adapted recipe and photos by For the Love of Cooking.net
Original recipe by Cathy at Noble Pig
  • 4 crescent rolls
  • Butter
  • 2 tbsp sugar
  • 3/4 tsp cinnamon

Preheat the oven to 375 degrees. Combine the cinnamon and sugar together and mix well. Place the unrolled crescent rolls onto an ungreased cookie sheet (I used my silpat mat). Spread a layer of butter on each triangle; top with cinnamon and sugar mixture. Roll from the bottom of the triangle to the point.


Place in the oven and bake for 10-11 minutes or until golden brown. Remove from the oven and serve while hot. Enjoy.

Tuesday, October 13, 2009

Asian Roasted Carrots

My daughter is a huge fan of cooked carrots so I decided to try roasting them with an Asian style marinade to go with the Asian Roasted Chicken and Sesame Noodles. These carrots were a huge hit with my entire family. They were extremely easy to make and paired nicely with the chicken and noodles.

Asian Roasted Carrots:
Recipe and photos by For the Love of Cooking.net
Adapted recipe from Allrecipes
  • 6 large carrots, halved
  • 3 tablespoons light soy sauce
  • 3 tablespoons rice vinegar
  • 2 cloves garlic, minced
  • 2 teaspoons sesame oil
  • 2 teaspoons minced fresh ginger root
Slice the carrots into sticks. Combine the soy sauce, rice vinegar, garlic, sesame oil and ginger in a zip lock bag. Add the carrots to the marinade and marinate for 30 minutes.

Preheat the oven to 425 degrees. Coat a glass baking dish with cooking spray then add the carrots (without the marinade) to the baking dish. Roast in the oven for 20-25 minutes or until fork tender. Enjoy.

Monday, October 12, 2009

Bean and Bacon Soup

This was the perfect soup to end the day. It was cold and rainy outside all day long and I wanted something warm and comforting for dinner. I thought a bean soup would be tasty. I found this simple and delicious recipe on Real Simple and adapted it just a bit. It was a hearty and delicious soup that my entire family loved. I enjoyed the salty flavor of the bacon with the creamy beans and soft carrots. I served this soup with my House Salad and some freshly baked bread. This was a quick and easy recipe with very little clean up - perfect for a week night meal.

Bean and Bacon Soup:
Recipe and photos by For the Love of Cooking.net
Adapted from Real Simple
  • 4 strips of lean bacon
  • 3 large carrot, chopped
  • 2 stalks celery, chopped
  • 1 small onion, chopped
  • 4 cloves garlic, minced
  • Sea salt and freshly cracked pepper, to taste
  • 1 bay leaf
  • 3 15 1/2-ounce cans white beans, drained
  • 4 cups chicken broth
  • 2 tablespoons chopped fresh parsley
In a large Dutch oven, fry the bacon until crisp. Remove and drain on paper towels. Let cool, chop, and set aside.

Over medium heat, add the carrot, celery and onion to the pan drippings in the Dutch oven and sauté for 7 minutes; add the garlic and sauté for an additional 60 seconds, stirring constantly. Season with sea salt and freshly cracked pepper, to taste.

Add 2 cans of beans, bay leaf and chicken broth. Bring to a boil, cover, and reduce heat to low. Let simmer for 15-20 minutes, or until the carrots and celery are soft.

Uncover and remove the bay leaf. Using a potato masher or an immersion blender, partially mash the bean mixture until it thickens slightly. Stir in the last can of beans, parsley and bacon. Taste and re-season with sea salt and freshly cracked pepper, if needed. Enjoy.


Click here for a printable version of this recipe - For the Love of Cooking.net